Fun with DIY
Reuse and Repurpose
Hello everyone, here is the fresh new stuff for you. To all the plant lovers and growers here is something interesting we are bringing for you, an excellent opportunity to show your creativity.
Design a planter for your plants… You can do a number of things to be versatile here. You can make use of recycling material, you can use colors, papers, plastic etc etc.
Lets’ see how you can do it and yesss, please do share your own ideas with us if you have any. As always, your suggestions are most welcome.
So let’s check through the material we can use to make a planter and then we will go step by step.
Plastic bottles:
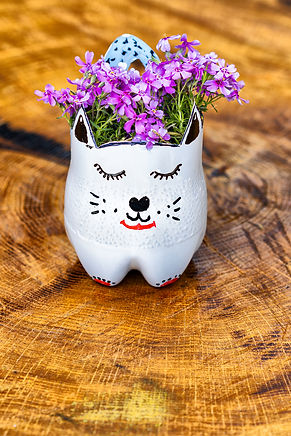
This is an amazing option to make your plant look beautiful! Have a look at the below picture
Please follow the below mentioned steps to have these type of planters made using plastic bottle;
Material needed:
-
Plastic bottles
-
Scissors/knife (keep your kids away from these tools)
-
Spray paint
-
Oil color/marker
-
Soil/potting mix
-
Plant
Procedure:
-
Cut a plastic bottle a part, the proportions depend on the size of the plant and the soil requirements. The shape can be anything as per your choice.
-
Use any spray paint of your choice and paint it from outside and Inside. Allow it to dry well.
-
Use oil colors or markers to make the art you like (here cat and human faces have been shown).
-
Fill the pot with soil, you can add some pebbles at the bottom and place your plant in it. Add water as per the need.
-
You can either keep this pot at a desired place or simply hang it in your.
-
garden upside down as shown in another picture above, both will make the place and plant look beautiful!!
-
Keep the pots away from fire.
DO NOT forget to make a drainage hole at the bottom.
Wooden crates:
Wooden crates retain for many years if the wood is of good quality and take good care of it.
Material needed:
-
Wooden crate
-
Oil paint
-
Wooden planks, Hammer and nails (if you want to make the crate your own)
-
A rope
-
Soil/potting mix
-
Plant
Procedure:
-
You can even form a crate using wooden planks if you have any with you but make sure they are in good condition as the plant's health also matters here.
-
You can either color it or use it as it is if the wood texture is nice, add some nice design if you are fond of creating some nice freehands. Do not draw anything on the wet color.
-
Fill the crate with soil and use it as a bed tray to plant or sow the seeds
-
Add water if needed.
-
You can decorate them at a house corner or simply hang in the garden area using rope.
DO NOT forget to make a drainage hole at the bottom.
Ice cream containers:
Ice cream container is another available option and you can have fun with it.
Material needed:
-
Ice cream containers
-
Oil paint
-
water/oil color or markers
-
cardboard
-
A rope
-
Soil/potting mix
-
Plant
Procedure:
-
Ice cream container can be used as normal plastic container
-
Apply oil paint on the outside of the box, and allow it to dry well. Then decorate by adding some design on it using water/oil colors or markers
-
You can make use of cardboards for patch work (simply cut the cardboard in desired shape, stick it on a container and paint it. Later just remove the cardboard and you will have different shape design on the container
-
Add soil in and place your plant in it.
-
Add water if needed.
-
You can place it on a side table as a decoration prop or hang in your garden using rope.
-
Ice cream container are very good option for the succulents to grow in it
-
Check the bottom of the container for the drainage holes.
Paint buckets:
Paint Bucket can also be used to hang the plant gracefully or simply put in a garden area are to enhance its beauty.
Material needed:
-
Paint buckets
-
Oil paint
-
water/oil color or markers
-
Adhesive tapes
-
A rope
-
Pebbles
-
Soil/potting mix
-
Plant
Procedure:
-
Get a paint bucket which is in good condition. If you have painted your house recently then this idea is going to be fun.
-
Apply oil paint on the outside of the bucket as these buckets will have the paint spilled over it, so apply the new shade evenly to make it look elegant. Allow it to dry well.
-
Add some artistic design on it using marker or water/oil color
-
You can make use of adhesive tapes here to have stripes on the bucket
-
Add soil in and place your plant in it. Add water if needed.
-
You can place them on a stand or simply hang in your garden area
-
Never forget to add drainage hole at the bottom
Biryani Handi :
If someday you ordered Biryani at your home to have a fantastic dinner with your family, many restaurants offer it in a Handi made of clay. These clay
handis can be used as a planter for our plants.
Material needed:
-
Clay handi
-
Spray paint
-
water/oil color or markers
-
Soil/potting mix
-
Plant
Procedure:
-
Clean the handi properly and gently and allow it to completely dry.
-
Once it is dried out well you can either use it as it is or can apply spray paint of your choice and keep aside to dry
-
After that you can add some fantastic design on it using marker or wet colors
-
Once the design is dried well use the handi for potting your plant
-
Hanging the handi may be not a good idea as it can fall down and break into pieces so just keep on a stand or wherever you think it will look good
Note: While adding potting mix you can add some compost in it considering the amount of soil.
Hope this is useful to make your garden look attractive and pleasing, please please share your own ideas with us if you have tried something innovative. The best ideas will be shared with our readers.